Changing Your Blogs Look

How to change your blogs look is not to difficult. With these step by step instructions, you will be able to change a lot of things. Say you want to change the color of the background in your posts, or maybe the color of your text. Well here is an easy way to do that. First you will want to go to design, and then click the Template design. I have these circled in red.

From here you can choose a new template, background colors, layout of your blog, and some others. We will be working with the advanced option.


Now for the fun stuff. Here is where you can play around a little bit. Once you have chosen the advanced option, you should see a screen that looks like this.

From here you can do all kinds of things. you can change the size of your text, color of your text, widget text color, tab text color, and many more things. I will not go over each one, as there is a lot of them. But if you have a question on one, feel free to ask. You can change things around and not be worried if you don't like it. Nothing is saved to the template until you hit apply to blog, witch I have circled on the top right. I hope you enjoy this little tutorial on how to change things around on your blog.


Embeding Video To Your Blog

How to embed a video to our blogger blog.
If you want to embed your own video, you will have to have a video account from a hosting site, like You Tube. Some other video hosting site will be fine, but for this tutorial we will be using You Tube, that's the video host site I have.
When you add a video to your blog, by embedding it, it does not have to be a video you made. You can embed videos made public by searching the videos you want and getting the embedded code. This is not illegal.
So now for the embedding: when you are making a post, you will see in the top right corner, Compose and Edit HLML , you will want to choose Edit HTML when you are ready to past the code. Then you will place the embed code in the post.
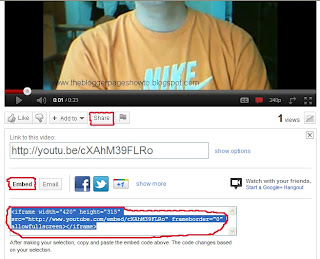
 How to get the embed code. First go to the video you want to embed, then hit share,  Embed, then copy the code. In the image above I have circled in red where you will find this.

Take the code and past it to the post while you are in Edit HTML.  Your Video should be in the post now.


That's all there is to embedding a video to your blog post. You might need to adjust the width in the code to get the Video to the size you need. If you have any questions, feel free to ask.

How To Add A New Header Image

There are different ways to add a header to your blog. This is just one way and you get a FREE imaging studio and use it to make your images the way you want. First you will want to down load Gimp. This is a FREE imaging studio software that you will be happy with I am sure. For the price, you cant beat it. To download Gimp you can click HERE. There are also tutorials on You Tube of how to use Gimp.
I will show you how to use gimp to add Images to your header, and place them where you want.
First lets start with a basic Image witch i will go create in my Gimp.
I have created an basic image and saved it to my pictures.


Now I will add some text like Welcome to my blog by choosing the Text tool.
I have added the text and saved it. This is what the image looks like now. ( This is a basic tutorial, so you can change fonts, text color's, size of text, and many other things.)
Now lets put an Image on our banner. You need the image you want to add to the banner in your pictures.
Go back to your Gimp software and open the banner, unless you have kept it open. Then hit file, then open, then choose the image you want to place in your header. This is to size the image to place in your header. Use the scale tool to make the image the size you want. I have made our banner 425 px wide and 150 px long, so I need to make the Image we are putting in fit.
So click on the scale tool and adjust the Image we are putting in. I have made the Image we are putting in 125 px by 100 px. Then choose the crop tool (little knife), and crop the new Image. This will take out the gray where we have scaled it. Then hit save as, and rename the image so you will still have the original. I usually do this by adding a 2. You will be asked to export, choose yes. I drag the image bar to 100% when exporting.
Now the new image is located in your pictures. Now we add the picture. Go to your header Image and hit file again. Then choose open as layer. This will let you open the Image you have in your pictures in your new header.Then you can choose the move tool to move the new Image added to you header Image.
When you have the Image the way you want hit file, then save as. Be sure to have it saved as .jpg To do this, after the image name just make sure it says .jpg     Now the Image is in your pictures and can be loaded to your blog as a header picture.
You will want to play around with this until you get familiar with Gimp. If you have any questions feel free to contact me.